
I’m not affiliated with 5th Edition Team Deathmatch in any way, but I’m incredibly stoked about their new Kickstarter campaign! If you’re not familiar with 5TDM, here’s a quick summary from their campaign page:
Small groups of player characters are pitted against each other in a no-holds-barred frenzy of carnage in a team-based, player-vs-player competition. 5th Edition Team Deathmatch is a contest of skill, wits, and luck. 5TDM is about winning the world’s most popular roleplaying game.
What interests me most about 5TDM are the amazing arenas in which the matches are played. Each arena features unique mechanics and absolutely drip with flavor. I mean, come on: something’s seriously wrong with you if names like “Death Wyvern’s Crucible” and “Ambulatory of Sorrow” don’t get your blood pumping!
The 5TDM core book, which has already funded, features 20 such arenas. A 21st arena is the campaign’s first stretch goal.
Speaking of arenas, here’s one of my own creations. It’s a fairly straightforward map, but I think that when it comes to brutal, deathmatch-style combat, simpler is better. Here’s the PDF: Bigby’s Gauntlet
Arena: Bigby’s Gauntlet
A workshop in a forgotten demiplane holds Bigby’s most infamous creation, the Adamantine Gauntlet. To claim—and keep—the legendary artifact, you and your teammates must triumph in a brutal, king-of-the-hill-style battle.
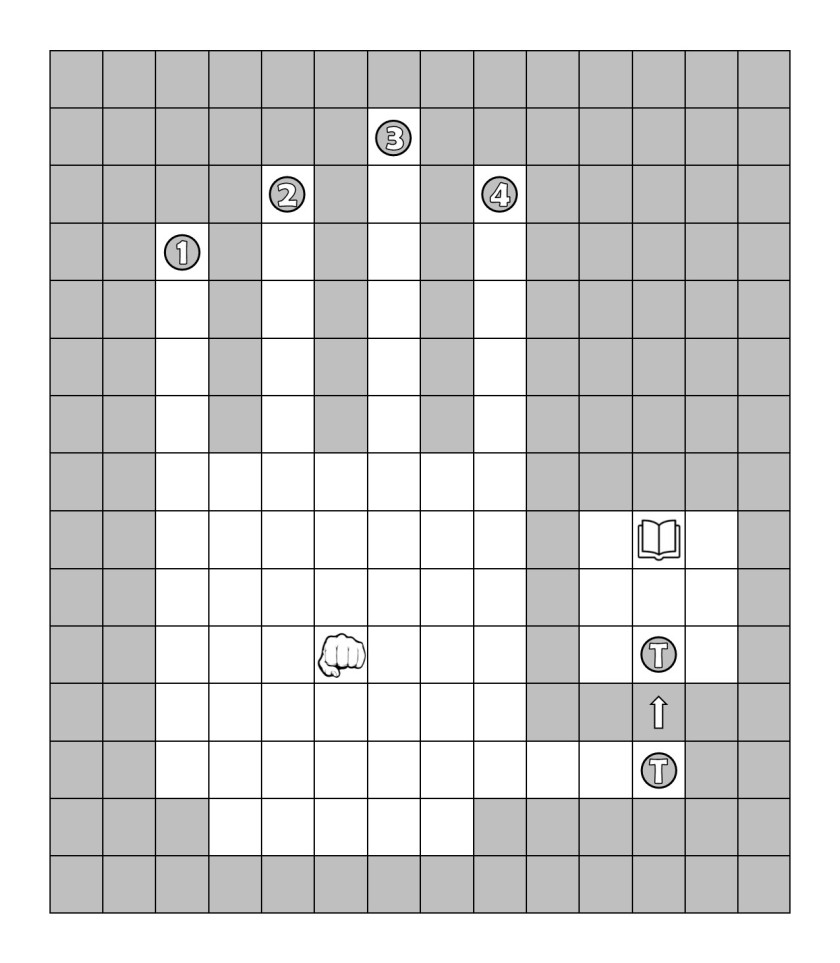 Respawn. If you start your turn dead, dying, or begin your first turn of the match, you may regain all hit points and hit dice, remove all failed death saves and conditions, refresh any abilities as if you had taken a short rest, and teleport to a random (d4) Respawn Point located in one of the arena’s four “fingers.” If another creature occupies that Respawn Point, that creature dies. If you were dying, you die before you respawn.
Teleportation Archway. If you move onto a Respawn Point, teleport to a random Respawn Point (d4). If another creature occupies the destination Respawn Point, that creature dies.
One-Way Teleportation Archway. A One-Way Teleportation Archway occupies the tip of the arena’s “thumb.” If you enter this Archway, teleport to the destination Archway in the arena’s Inner Sanctum (see below). If another creature occupies the destination Archway, that creature dies.
Forced Teleportation. If a creature moves onto a Respawn Point or the One-Way Teleportation Archway during your turn, teleport that creature according to the rules outlined above. If another creature occupies the teleport destination, that creature dies.
Killing Spree. If you reduce 2 or more enemies with at least 1 hit point each to 0 hit points or fewer on a single turn, immediately gain one of the following:
- Take another action (as per the fighter’s Action Surge class feature)
- Regain all ki points, bardic inspiration, and rages
- Regain your lowest level expended spell slot
Humiliation. A creature rolling a natural 1 on an attack roll or saving throw is knocked prone immediately after the attack roll or saving throw is resolved.
Hard Corners. All corners in the arena are “hard” (i.e. creatures can’t move diagonally across a corner).
Adamantine Gauntlet. Bigby’s adamantine gauntlet floats above the center of the arena’s “palm.” The gauntlet doesn’t block line of sight, and the gauntlet is immune to all damage and effects. Creatures can move through the gauntlet’s space. The gauntlet can’t enter Respawn Points or the One-Way Teleportation Archway. A creature occupying the same space as the manual of the gauntlet (see below) can take control of the gauntlet.
Inner Sanctum. The 15’-square area above the arena’s “thumb” once served as Bigby’s sanctum sanctorum. A creature in the Inner Sanctum doesn’t have line or sight or line of effect to the creatures in the arena’s main area, and vice versa.
The One-Way Teleportation Archway doesn’t function from this side. A creature can escape the Inner Sanctum only by respawning.
Manual of the Gauntlet. An instruction manual for controlling the adamantine gauntlet rests atop a lectern against the Inner Sanctum’s northern wall. The manual of the gauntlet is immune to all damage and effects and can’t be moved in any way.
A creature that occupies the manual’s space can take control of the adamantine gauntlet. A creature controlling the gauntlet can use an action to move the gauntlet up to 60 feet and then cause one of the following effects:
- Clenched Fist: Make an attack roll with a +10 bonus against one creature within 5 feet of the gauntlet. On a hit, the target takes 4d8 force damage.
- Grasping Hand: Attempt to grapple a creature within 5 feet of the gauntlet, with a +10 bonus to your roll. While the gauntlet has a creature grappled, you can use a bonus action to deal that creature 2d6 bludgeoning damage. The creature can use an action to escape the grapple as normal (escape DC 20). The grapple also ends if you move the gauntlet or use an action to cause another effect with the gauntlet.
- Interposing Hand: The gauntlet occupies its space until the beginning of your next turn. A creature can use an action to push past the gauntlet by making a DC 20 Strength check. On a success, the creature can move through the gauntlet’s space, but that space is considered difficult terrain for the target.
